|
|
||||||||||
|
||||||||||

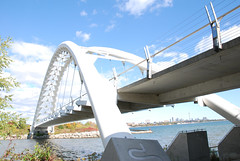
HDR (High Dynamic Range) photography goes as far back as the 1850's when Gustave Le Gray used the technique to take one negative of the sea and one of the sky and combine them into one positive. HDR imaging was developed in the 1930's and 1940's by Charles Wyckoff. The process of tone mapping with bracketed images was first reported in 1993 and resulted in a mathematical theory that was published in 1995 by Steve Mann and Rosalind Picard. One of the many differences between a camera and the human eye is camera can only take a recording of what it saw for a specific moment in time. The eye together with the brain however, constantly adjusts in real time to compensate for the many subtle and large differences in the light in a given scene. Imagine you are out on a sunny day with a few clouds in the air standing beside a bridge that is higher up that you are. You aim your camera up to the bridge and take a picture. Reviewing the picture you just took, you find some of the detail on the bridge and the clouds are washed out. Dialing up a shorter exposure on the camera, you snap another shot under exposed a bit. This time the area under the bridge is too dark to make out any details. Back to the exposure control you over expose the picture a bit. You can make out all the details under the bridge but everything else is now over exposed and washed out.
The eye and brain together make constant adjustments when we look at a scene with highlights and shadows. When looking at dark areas, the iris in the eye will open to let in more light. Looking at bright areas of a scene, the iris will close to let in less light. What is recorded in the brain is the constantly adjusted version of what the eye was seeing while scanning the entire scene as seen below. Unfortunately cameras can not do this, and as a result, it is limited at taking images as above.
There are various ways to achieve this effect. The one used for this photograph is called tone mapping. The following are simple instructions of how I did it. The first thing is to recognize a scene with high contrast. Contrast is a measurement of bright to dark. If a scene has very bright areas and very dark areas, then the scene has high contrast. Looking at the metered exposure you can easily see that the bridge supports are bright white in the sun while the underside of the deck is in shadow. Now it's time to do what the eye does. For this example I took three pictures. My camera has a setting called exposure bracketing. By setting the camera to aperture priority and turning on the exposure bracketing, the camera will automatically take three pictures. One exposed to the metered exposure, one under exposed by 2 f-stops, and a third over exposed by 2 f-stops. Check the manual that came with your camera, or the internet, to see if your's has exposure bracketing and or aperture priority mode. These two modes help, but are not required. The only thing that is required is adjusting the exposure. If your camera does not have exposure bracketing, look for exposure compensation. By adjusting that, you can achieve the same result. Take the first picture, adjust the exposure compensation to -2, take the second picture, and finally set the exposure compensation +2 and take the third picture. Remember to set it back to 0 after you have taken the third picture. Tips for taking the images.
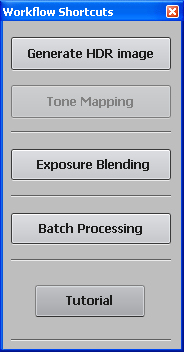
The software used in this example is Photomatix from HDRSoft. You can download the trial version from their site. It is fully functional and never expires, but it does watermark the images until you register it. The site also host examples and lots of help and explanations that are beyond this tutorial. A worthwhile read if you have the time. After you have downloaded and installed it, you will be presented with some workflow shortcuts. Select Generate HDR image. Next click on Browse, select your three images, and click on Open.
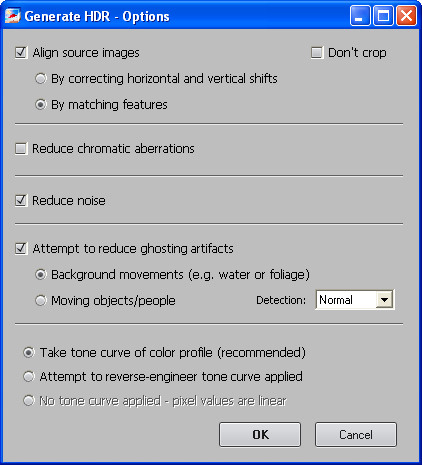
The next screen you see will be the options used to generate the HDR. Select the options as follows.
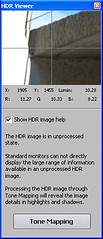
When Photomatix is done its gyrating, you may be asking what happened. An image worse than any of the original three is displayed. What you are looking at is a high dynamic range image. The problem is almost every monitor, except for specialized ones, is not capable of displaying this kind of image. If you move your mouse over that nasty looking image, you will notice the window in the HDR Viewer is showing what a small part of the image looks like. You will also notice that as you move from light to dark areas of the image, the viewer will lighten and darken the view to show you what that area looks like. This is kind of what your eyes do as you look around a scene you are standing in front of. Making those constant adjustments to allow you to see in those bright and dark areas by only looking at a small portion of the complete scene at a time. When you are done looking around, press the Tone Mapping button to go on to the next stage.
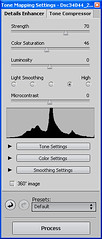
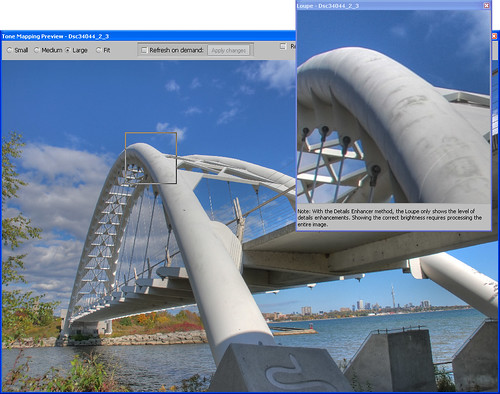
Hopefully you are still with me here. What you should see now, assuming all is going well, is an image closer to reality. Don't panic with all those sliders and buttons over there. We are taking the short route this time through. As previously, there is a preview window. By clicking on the image and dragging your mouse around, you will see a little box on the image and a preview window showing you what is in that box. The preview loupe shows a guess at how that small section of the image will be rendered. Feel free to play with the controls later to see what happens. Even switch between the Details Enhancer tab and the Tone Compressor tab. By selecting Default from the Presets drop down list, it will return all the controls back to their default position. Click the Process button and wait for some more processing.
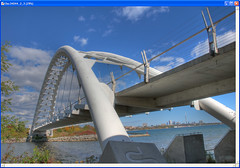
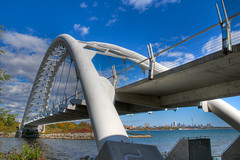
Almost done now. Now that the gyrating has completed, you are looking at the tone mapped image. All that is left to do in this program is to click on File, Save As, and save your image. As you can see below, the tone mapped image is a little washed out. This is one of the side effects of the process. Load the image up into your favourite image editing software and adjust the contrast, usually more, until you like what you see. That should produce an image similar to the right below.
Now go out and have some fun with your camera. For more information, check out the following links. |